? 第一步:进入 Nginx 配置目录
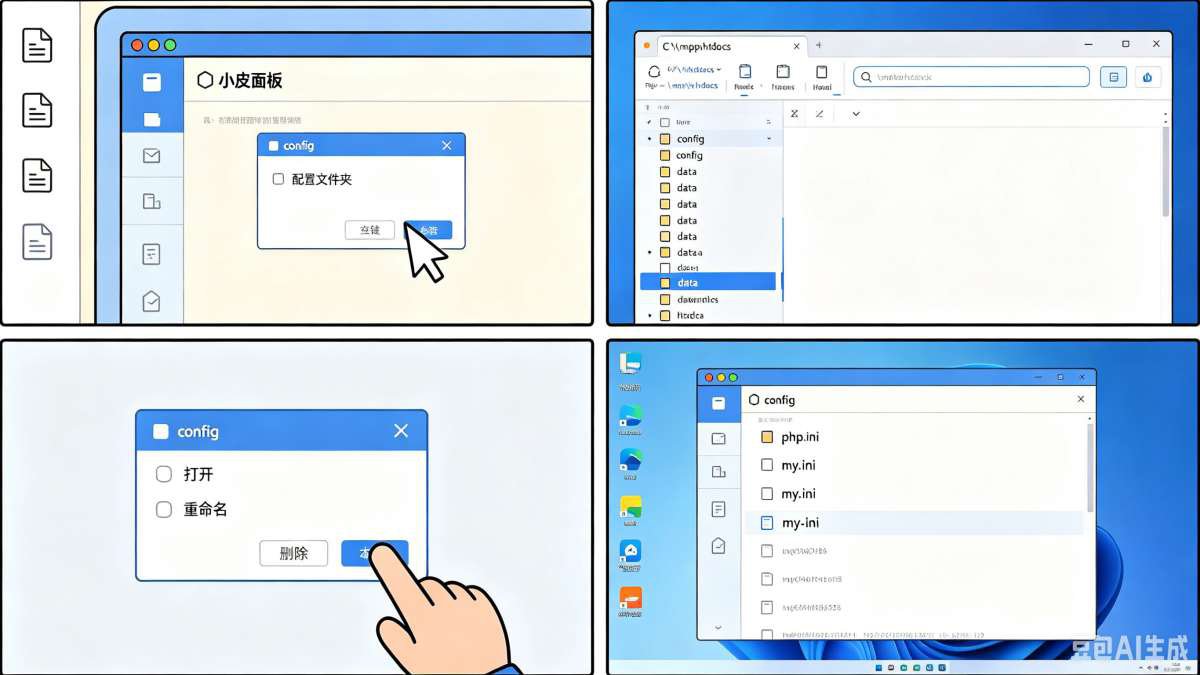
在当前的 phpstudy_pro 文件夹里,按下面的路径找:D:\phpstudy_pro\Extensions\Nginx\conf\
– 最后打开 conf 文件夹,里面就是 Nginx 的主配置文件

✅ 已改好的完整 nginx.conf (直接替换)
#user  nobody;
worker_processes 4;
#error_log  logs/error.log;
#error_log  logs/error.log  notice;
#error_log  logs/error.log  info;
#pid        logs/nginx.pid;
worker_rlimit_nofile 100000;

events {
     worker_connections 40960;
}

http {
    include       mime.types;
    default_type  application/octet-stream;
    #log_format  main  '$remote_addr - $remote_user [$time_local] "$request" '
    #                  '$status $body_bytes_sent "$http_referer" '
    #                  '"$http_user_agent" "$http_x_forwarded_for"';
    #access_log  logs/access.log  main;

    sendfile  on;
    #tcp_nopush     on;
    #keepalive_timeout  0;
    keepalive_timeout 65;
    #gzip  on;

    map $time_iso8601 $logdate {
        '~^(?<ymd>\\d{4}-\\d{2}-\\d{2})' $ymd;
        default                       'date-not-found';
    }

    # --------------------------
    # 这里是你要改的核心部分
    # --------------------------
    # 所有虚拟主机的IPv6支持,在各自的.conf里配置即可
    include vhosts/*.conf;

    # HTTPS server 模板(不用改,只是示例)
    #
    #server {
    #    listen       443 ssl;
    #    listen       [::]:443 ssl; # 加这一行就支持IPv6的HTTPS
    #    server_name  localhost;
    #    ssl_certificate      cert.pem;
    #    ssl_certificate_key  cert.key;
    #    ssl_session_cache    shared:SSL:1m;
    #    ssl_session_timeout  5m;
    #    ssl_ciphers  HIGH:!aNULL:!MD5;
    #    ssl_prefer_server_ciphers  on;
    #    location / {
    #        root   html;
    #        index  index.html index.htm;
    #    }
    #}

    client_max_body_size  50m;
    client_body_buffer_size 60k;
    client_body_timeout 60;
    client_header_buffer_size 64k;
    client_header_timeout 60;
    error_page 400 /error/400.html;
    error_page 403 /error/403.html;
    error_page 404 /error/404.html;
    error_page 500 /error/500.html;
    error_page 501 /error/501.html;
    error_page 502 /error/502.html;
    error_page 503 /error/503.html;
    error_page 504 /error/504.html;
    error_page 505 /error/505.html;
    error_page 506 /error/506.html;
    error_page 507 /error/507.html;
    error_page 509 /error/509.html;
    error_page 510 /error/510.html;

    keepalive_requests 100;
    large_client_header_buffers 4 64k;
    reset_timedout_connection on;
    send_timeout 60;
    sendfile_max_chunk 512k;
    server_names_hash_bucket_size 256;
}

error_log D:/phpstudy_pro/WWW crit;
? 接下来:给你的网站配置加IPv6

打开 D:\phpstudy_pro\Extensions\Nginx\conf\vhosts\ 里你的站点 .conf 文件,按下面的模板改:网站的
server {
    listen 80;
    listen [::]:80; # 加这一行,开启IPv6的80端口监听
    server_name 你的域名;
    root "你的网站目录";
    index index.html index.php;

    # 如果你的站点用了HTTPS,也要这样改:
    # listen 443 ssl;
    # listen [::]:443 ssl;
    # ssl_certificate 你的证书.pem;
    # ssl_certificate_key 你的证书.key;
}
?给你的网站配置加IPv6
© 版权声明
THE END
暂无评论内容